Sync Gorgias data with a database
Introduction
Gorgias' HTTP integration can also be used to send Gorgias information to third-party applications such as Google sheets. This tutorial will show how to set up an HTTP integration to automatically populate a database.
Step 1: Find the variables that you would like to add to the database
In Gorgias, explore the Ticket object in our API reference documentation to determine what information you want to send to the database. The most common variables are listed in our docs.
Step 2: Find the endpoint from the third-party application to append values
Visit the third-party application's developer documentation to find the correct endpoint, HTTP Method, headers (including authentication credentials), and the Request Body to append or change a spreadsheet.
You will find a post request that is likely similar to the following one:
POST https://databasesoftware.com/v4/spreadsheets/{spreadsheetId}/values/{range}:appendThese are the values that would be used when setting up your HTTP integration or Macro Action.
Step 3: Setting up a mechanism to send the data from Gorgias
Gorgias allows a couple of different flows that assure data is sent from the ticket to the endpoint you choose.
HTTP Integrations
The first option is the automatic one, using HTTP integrations that are preset with the exact variables that are sent to the endpoint. You will find this setup under Settings > HTTP integration (App Store section)
Then simply click the add HTTP integration button to generate a new integration on the top right of the page.
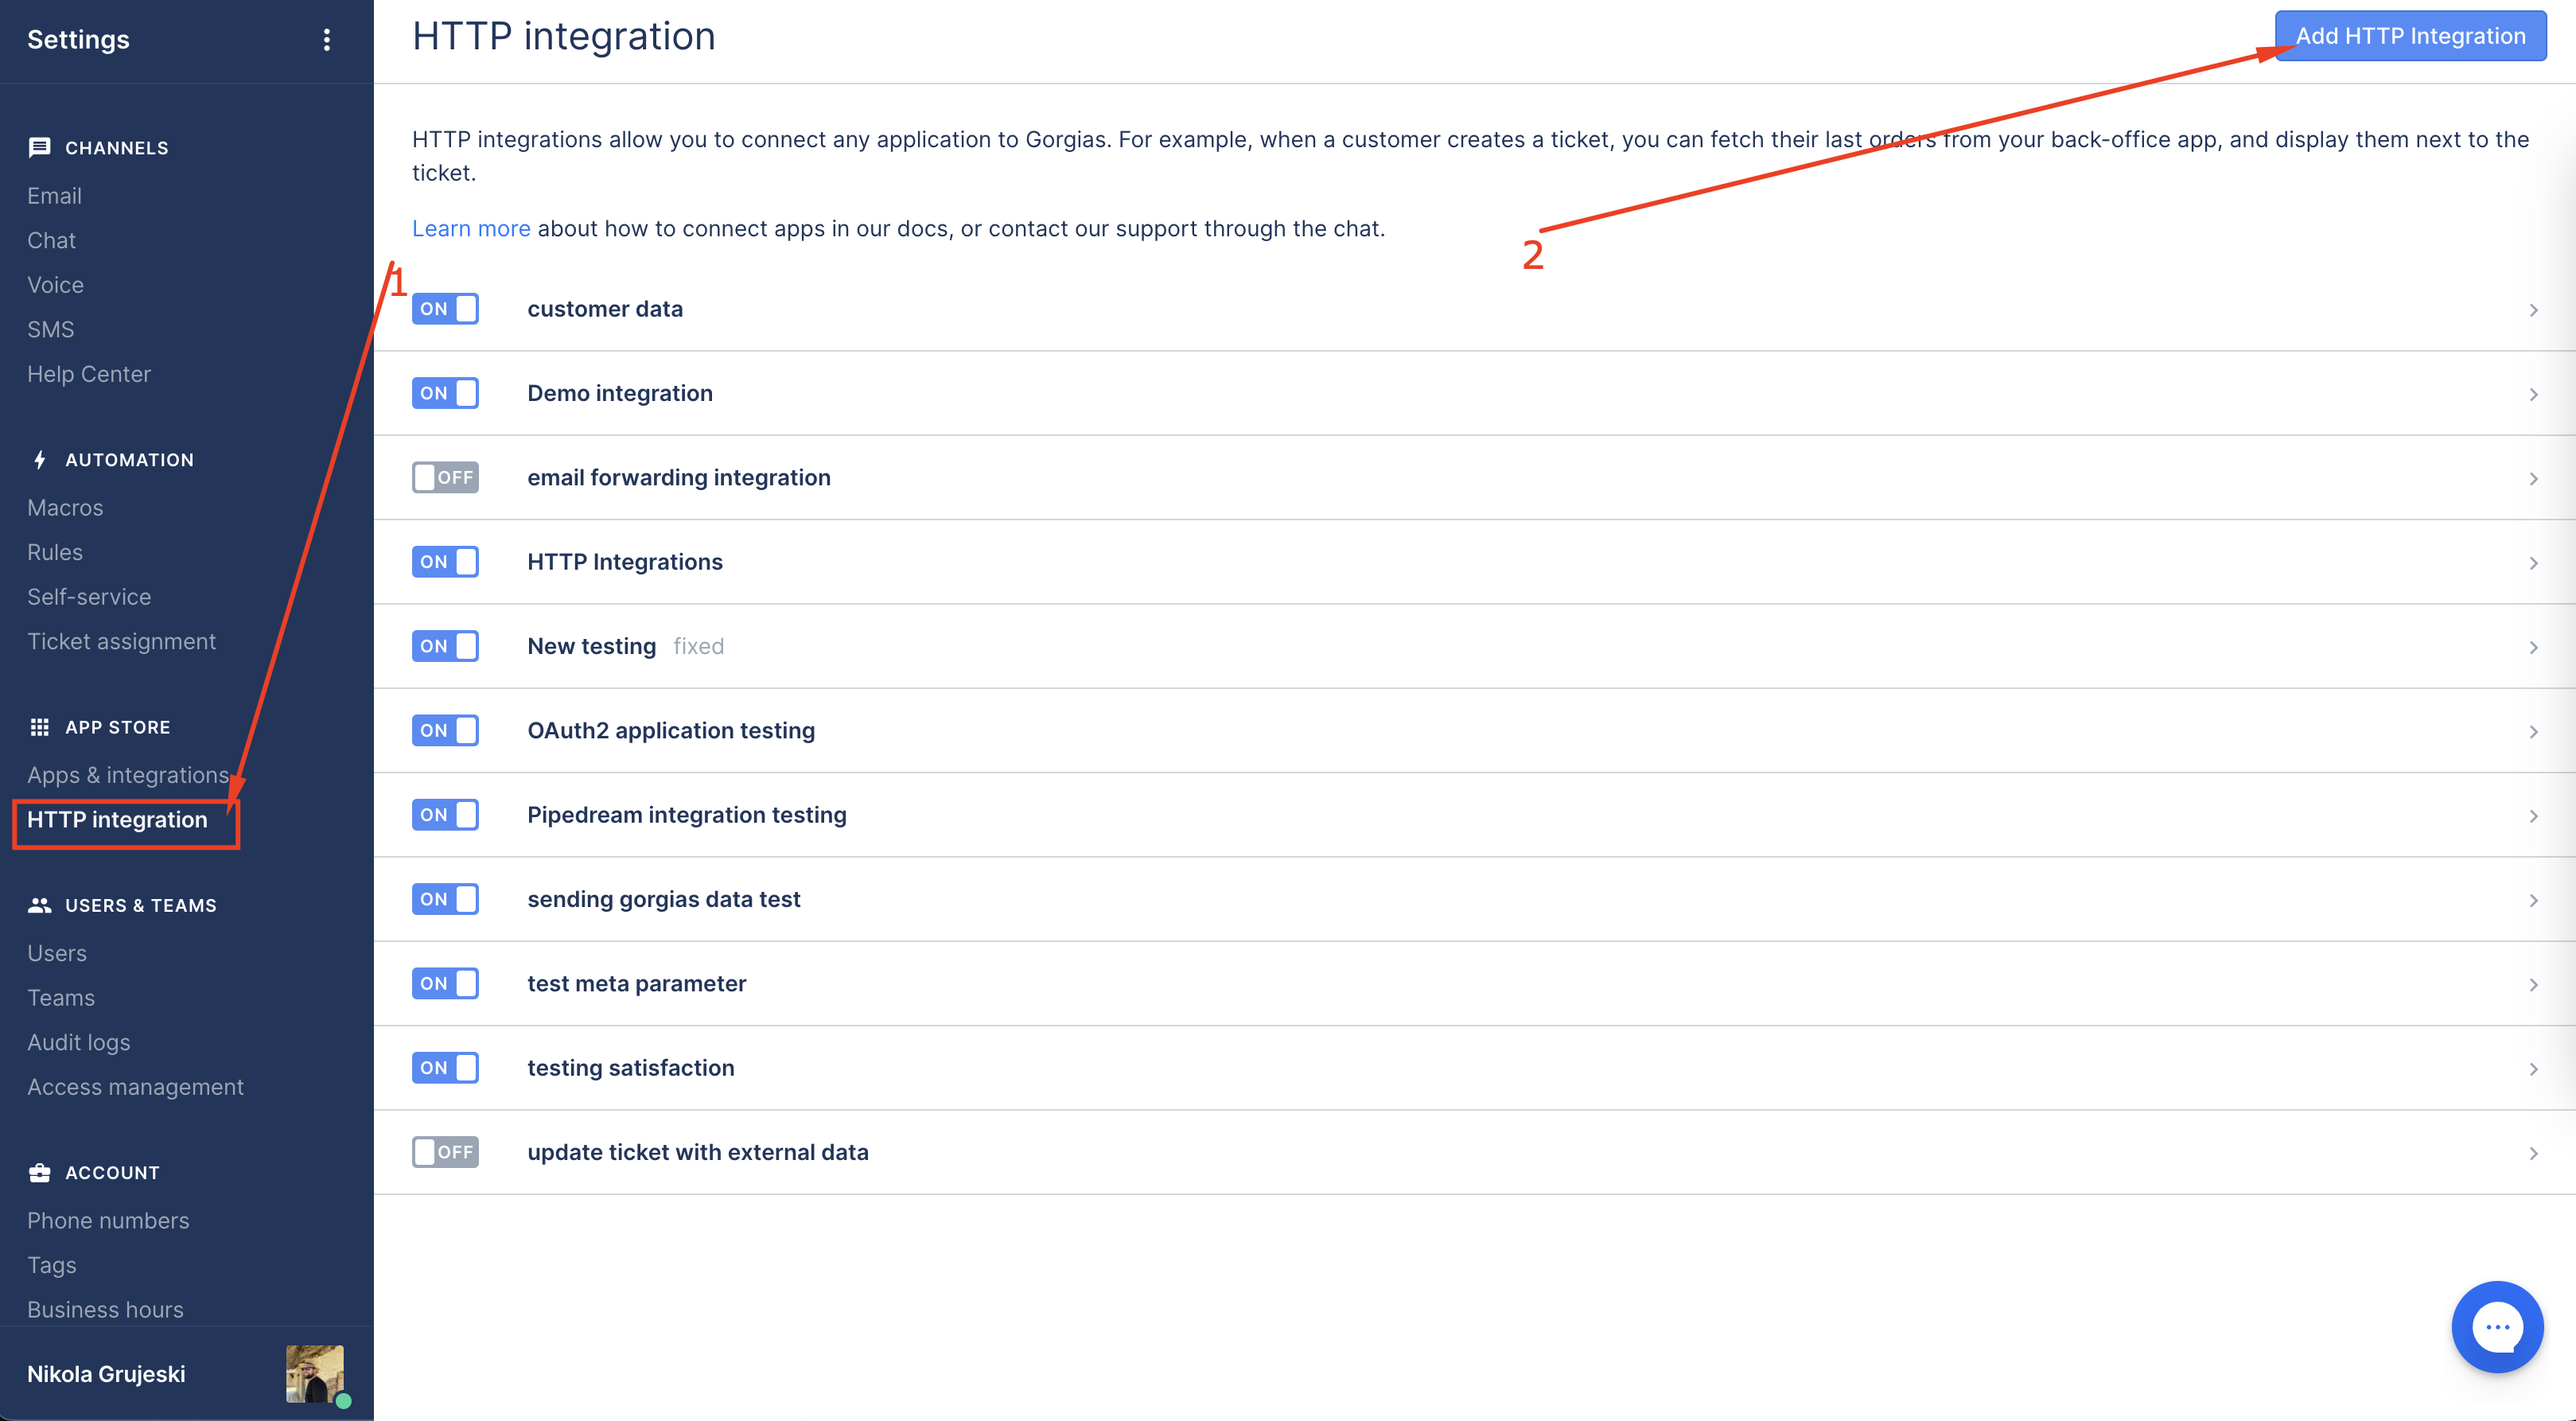
Creating a new integration
Setting up an HTTP integration steps
- Choosing the trigger will allow you to control how often the API request is sent. While ticket updates might be offering the most timely updates, by choosing this option you can hit the rate limit if too many requests are sent in a short period of time, so double-check the endpoint to which you are sending the requests to on the limitations
- URL of the endpoint in your system/webhook link in Zapier/PipeDream etc
- POST or PUT requests are to be used to pass the data via API request
- If your database/application requires authentication, you would add it to the headers section
- This is where you would add the data you are looking to pass to the system, in a form of a JSON file. Keys (on the left) should correspond to the names of the columns in your database, while the values (on the right) would be the values in Gorgias (variables are most commonly used here)
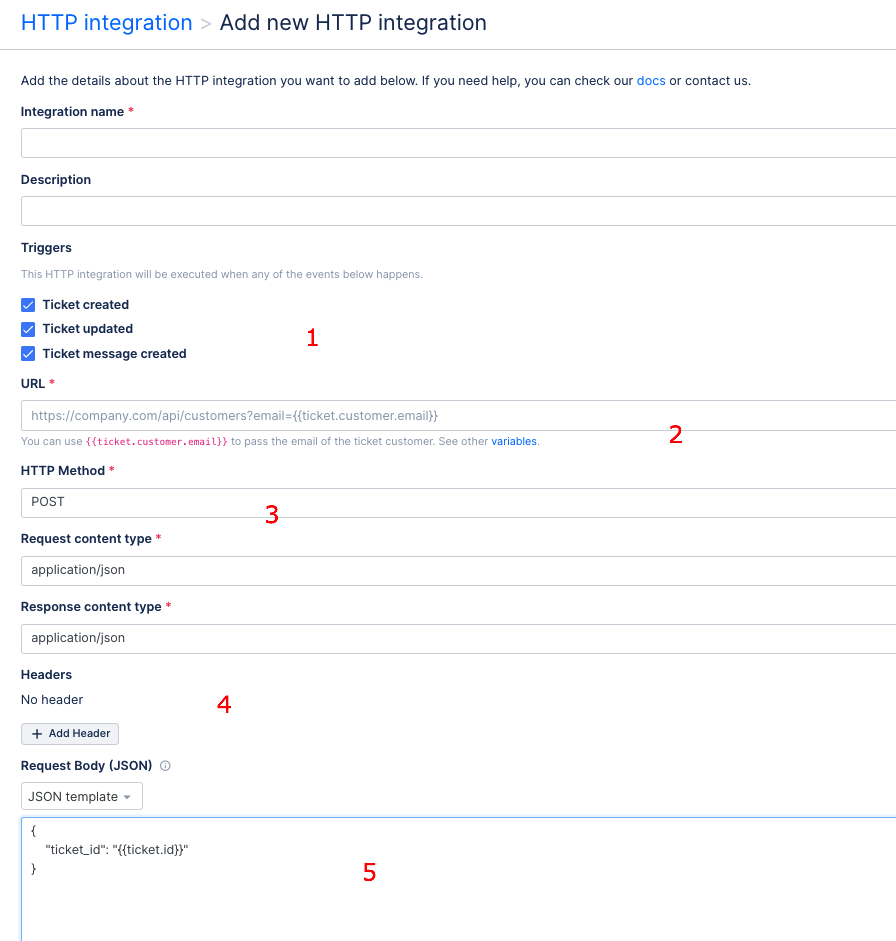
HTTP Integration setup
Macro Actions
The second option is using Macro actions and sending a controlled webhook manually. This allows more control over the data that is sent as the user can adjust the values and send the updates only when needed.
Macro action can be set from the Macro setup, by choosing the HTTP hook from the Add Action list.
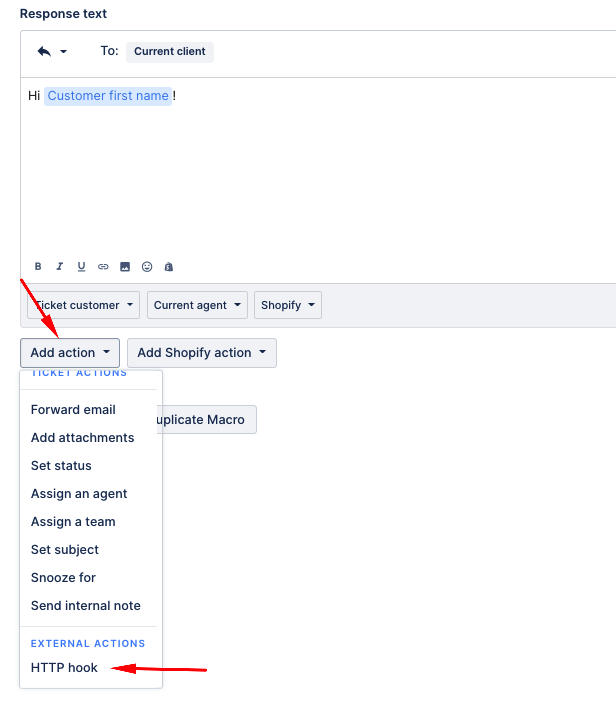
Creating a new macro
The setup is similar to the one for the HTTP integrations but there are a few key differences:
- POST or PUT request should be used
- URL of the endpoint in your database/ webhook link in Zapier/PipeDream etc
- If your database/application requires authentication, you would add it to the headers section
This is where you would add the data you are looking to pass to the database. We suggest adding it in the form of “application/x-www-form-urlencoded”. but you can also use JSON payload in the request. Keys (on the left) should correspond to the names of the columns in your database, while the values (on the right) would be the values in Gorgias (variables can be used here, but you can also input the data manually and even edit the initial data input, but only if the x-www-form-urlencoded is selected; if you are using JSON template, the data which you set will not have the option to be updated)
If you selected x-www-form-urlencoded, the buttons on the right allow you to set up the pre-determined values (for example variables or some constants that are always the same) as non-editable. Also, this is where you can choose if the field is mandatory or not
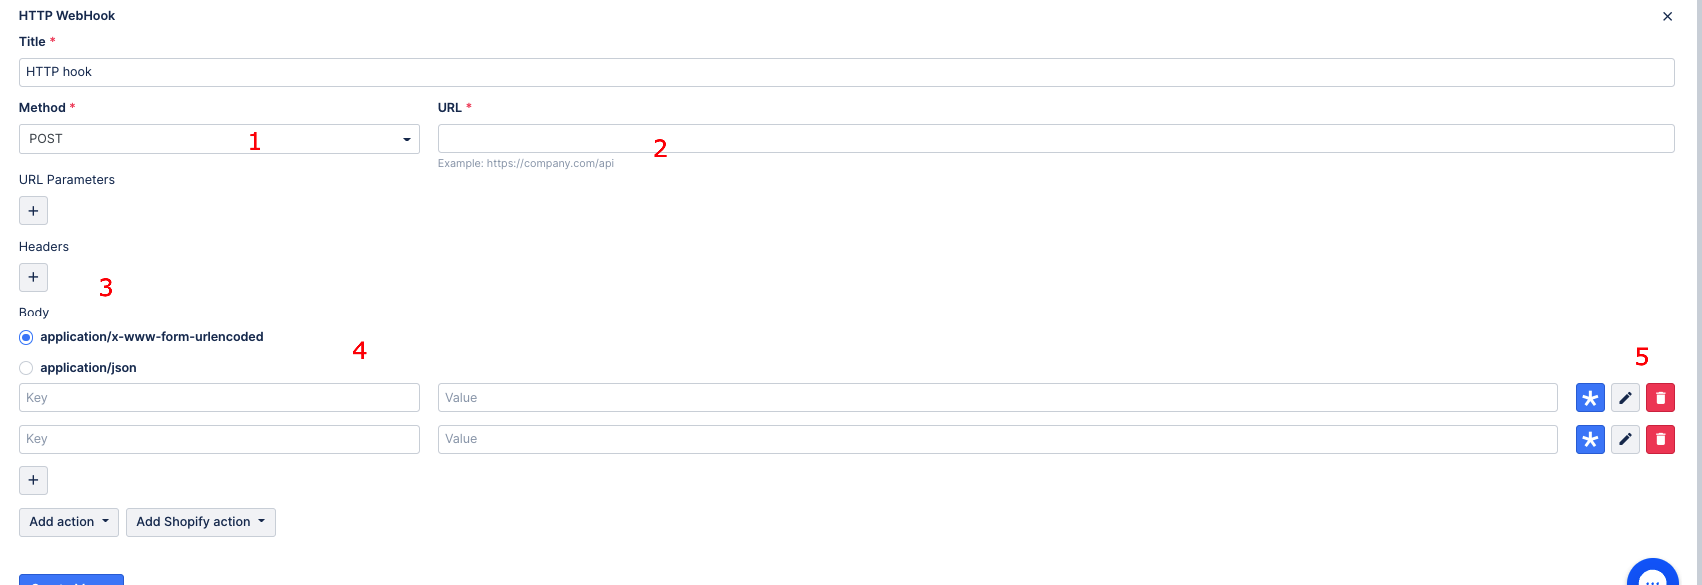
Macro setup
Note that there is no pre-set trigger, the request will apply when the macro is applied in a ticket.
The way to use the macro actions is to click on the particular macro you want to use from the macro list in the ticket, then populate the values and finally apply a macro to send out the HTTP request.
Finally, when the request is sent, you will be able to check out the payload by hovering over the macro name in the ticket and expanding for more details, as shown in the video.
Widget Buttons
The third option is the usage of the widget button, which allows you to pass the data from the ticket with just a click of the button.
The setup is pretty much the same when it comes to the API request. Setting up the button can be done from the widget section by selecting edit widget:
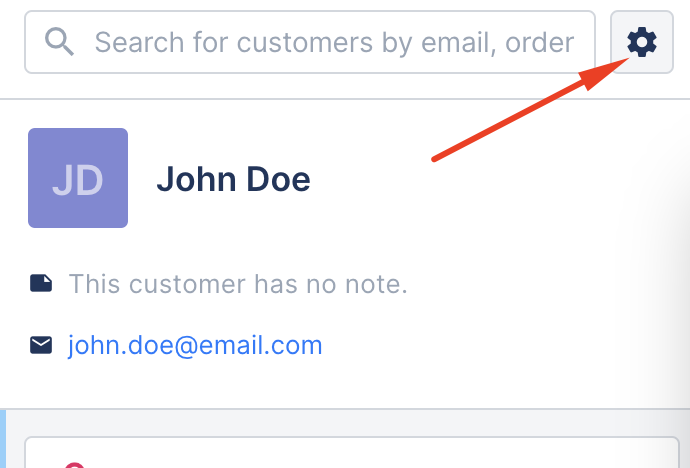
Edit widget
Use the option to Add a Button:
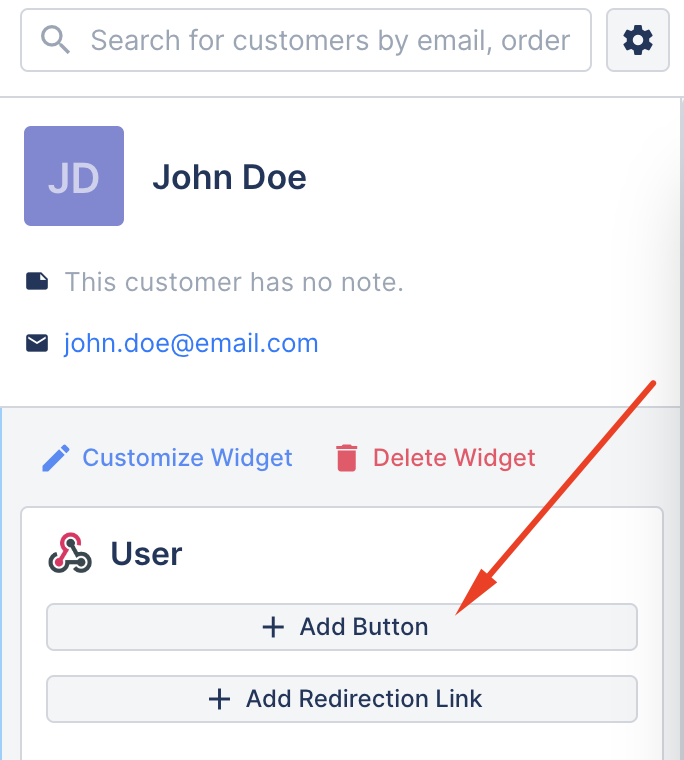
Adding a button
Once you select Add Button the setup pop-up will appear. The setup is similar to the one used for setting up webhook in macros.
These are the steps for setting up a custom action button:
- POST or PUT request should be used
- URL of the endpoint in your database/webhook link in Zapier/PipeDream etc
- If your database/application requires authentication, you would add it to the headers section
This is where you would add the data you are looking to pass to the database. We suggest adding it in the form of “application/x-www-form-urlencoded”. but you can also use JSON payload in the request. Keys (on the left) should correspond to the names of the columns in your database, while the values (on the right) would be the values in Gorgias (variables can be used here, but you can also input the data manually and even edit the initial data input, but only if the x-www-form-urlencoded is selected; if you are using JSON template, the data which you set will not have the option to be updated)
If you selected x-www-form-urlencoded, the buttons on the right allow you to set up the pre-determined values (for example variables or some constants that are always the same) as non-editable. Also, this is where you can choose if the field is mandatory or not
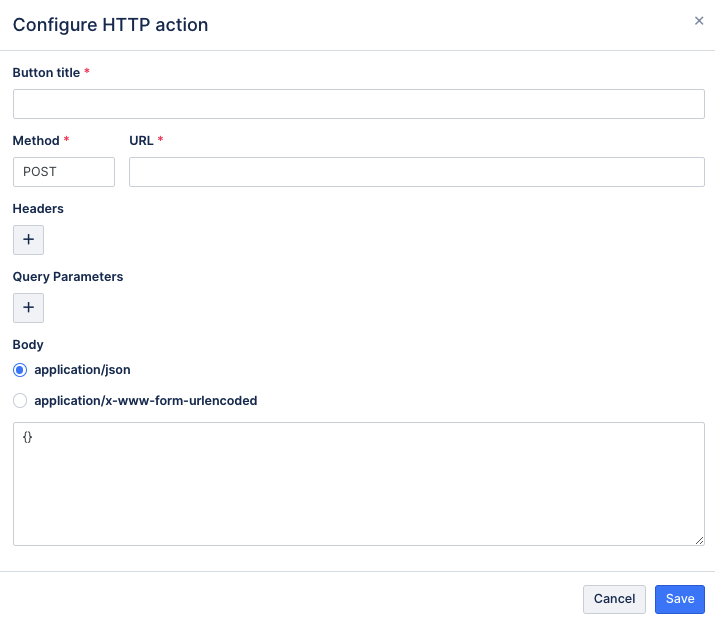
Button configuration popup
Now you can send the data from the ticket by clicking the button in the widget to the right. Similar to the macro actions, the buttons do not apply the request until they have been clicked.
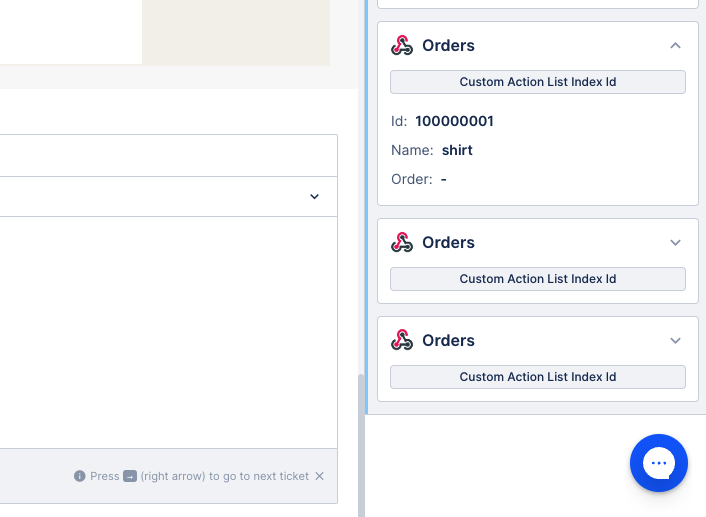
Buttons on the widget
Updated 5 months ago