How to attach Gorgias tracking data to Shopify Cart and Checkout attributes
Intended audience
This guide is intended for developers working on e-commerce stores that meet the following criteria:
- have a headless setup
- have access to the Gorgias Convert
Introduction
This tutorial aims to demonstrate how to attach Gorgias-related custom attributes to a Shopify order. This data can later be used to match orders with user events that led to the sale.
In particular, we need to persist the gorgias.guest_id and gorgias.session_id, where gorgias.guest_id should be unique across multiple user sessions on your store.
We'll do this by using methods available through the window object. These methods come from GorgiasBridge, our suite of revenue-focused features. We'll then attach the collected data to the Shopify cart or checkout using the Storefront API.
Step 1: Initialize GorgiasBridge
Gorgias provides access to the GorgiasBridge API by attaching it to the browser's window object. However, we need to ensure the API is fully initialized before calling any of its methods.
Place the following code snippet close to where you create the Shopify cart or checkout object:
var initGorgiasBridgePromise = (window.GorgiasBridge)
		? window.GorgiasBridge.init()
		: new Promise(function (resolve) {
				const timer = setTimeout(() => reject(), 500);
				window.addEventListener('gorgias-bridge-loaded', function () {
						clearTimeout(timer);
						resolve();
				})
			});

initGorgiasBridgePromise.then(async () => {
    // attributes attachment will happen here
})
We will populate the then block in the steps below.
When using
GorgiasBridgein a<script></script>tag in your HTML, always use theinit().then(...)pattern. This ensures your script runs only after theGorgiasBridgehas been downloaded and initialized.
Step 2: Get the attributes
We are interested in the following two functions:
window.GorgiasBridge.createCartAttributes();
window.GorgiasBridge.createCheckoutAttributes();
We can use these functions to obtain cart or checkout attributes:
const cartAttributes = window.GorgiasBridge.createCartAttributes();const checkoutAttributes = window.GorgiasBridge.createCheckoutAttributes();The format of the attributes is consistent for both the cart and the checkout, for example:
[
    {
        "key": "gorgias.guest_id",
        "value": "c5584f0a-9ac0-4c82-8f96-607c9a8cf8a8"
    },
    {
        "key": "gorgias.session_id",
        "value": "70d2345a-a9ad-407a-ac25-f060e5312f2d"
    }
]
Step 3: Attach the attributes
Whether you attach the attributes to the cart or the checkout depends on your store's configuration. Some stores don't customize the checkout process and rely on the default Shopify checkout. We leave it up to your discretion where to attach the attributes.
Attaching to the cart
The Storefront API provides two methods for attaching attributes to the cart object - when the cart is created using cartCreate or by directly calling cartAttributesUpdate for an existing cart.
Regardless of the method used, the attributes are always of the AttributeInput type, and createCartAttributes returns an array of such attributes.
The specific code implementation will vary based on the technology used in your store, but a complete example might resemble the following:
// Your code creates the `cart` object here
const cart = ...

var initGorgiasBridgePromise = (window.GorgiasBridge)
		? window.GorgiasBridge.init()
		: new Promise(function (resolve) {
				const timer = setTimeout(() => reject(), 500);
				window.addEventListener('gorgias-bridge-loaded', function () {
						clearTimeout(timer);
						resolve();
				})
			});

initGorgiasBridgePromise.then(async () => {
    const cartAttributes = window.GorgiasBridge.createCartAttributes();
		cart.attributes = [...(cart.attributes || []), ...cartAttributes]
}).finally(() => {
		// Your code calls the Storefront API here to create the cart
});
After creating the cart with an API call to the StorefrontAPI, the attributes will be attached. These attributes will automatically be passed to the order once the checkout is completed.
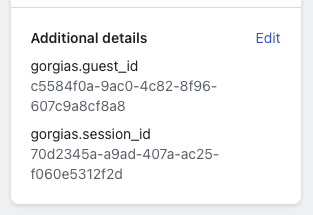
To verify the successful implementation, navigate to your Shopify Admin. Newly created orders should now display similar attributes in the order detail:

Attaching to the checkout
The Storefront API provides two methods for attaching attributes to the checkout object - when the checkout is created using checkoutCreate or by directly calling checkoutAttributesUpdateV2 for an existing checkout.
Similarly to the cart, attributes are of the AttributeInput type, and createCheckoutAttributes returns an array of these attributes.
The specific code implementation will vary based on the technology used in your store, but a complete example might resemble the following:
// Your code creates the `checkout` object here
const checkout = ...

var initGorgiasBridgePromise = (window.GorgiasBridge)
		? window.GorgiasBridge.init()
		: new Promise(function (resolve) {
				const timer = setTimeout(() => reject(), 500);
				window.addEventListener('gorgias-bridge-loaded', function () {
						clearTimeout(timer);
						resolve();
				})
			});

initGorgiasBridgePromise.then(async () => {
    const checkoutAttributes = window.GorgiasBridge.createCheckoutAttributes();
		checkout.customAttributes = [...(checkout.customAttributes || []), ...checkoutAttributes];
}).finally(() => {
		// Your code calls the Storefront API here to create the checkout
});
Once the checkout is created on Shopify and the customer completes it, the attributes will be attached to the order.
To verify the successful implementation, navigate to your Shopify Admin. Newly created orders should now display similar attributes in the order detail:
Calling Storefront API from the server side
The previous examples focused on the frontend side; however, some headless stores use server-side rendering, such as the Shopify Hydrogen stack.
Attributes retrieval from the GorgiasBridge remains the same as in the examples above. The additional step involves sending the data to the server. This process depends on the specific technologies you use, but the principle remains the same as in the previous examples. The goal is to attach the Gorgias-generated attributes to the cart or the checkout object.
Attaching to cart or checkout
The decision of whether to attach the attributes to the cart or the checkout ultimately depends on your preferences and store setup. If your store allows customers to bypass the cart creation process, attaching attributes to the cart may not be successful for all orders. In such cases, attaching the attributes to the checkout is better. If your store does not customize the checkout experience, attaching the attributes to the cart is the only option.
Updated 10 months ago