3. Set up OAuth2
A guide on how to set up OAuth2 authentication for your app.
OAuth2 App credentials
Once you have created your draft app you will get access to your credentials: Client ID and Client Secret.
These credentials are necessary to identify your app when a Gorgias user "installs" your app and authorizes the requests to get the access_token from Gorgias.
Save your credentials somewhere securely in your config/environment files.
OAuth2 authorization flow
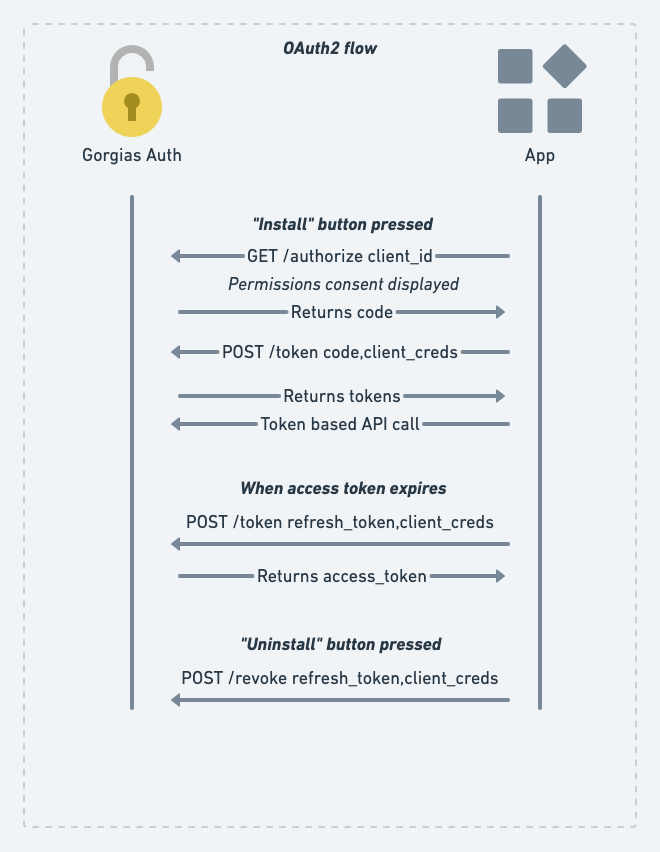
The authorization flow below provides a high-level view of the process of obtaining the Access Token needed to make OAuth2 bearer token requests.

Gorgias OAuth2 authorization flow
User clicks "Connect App" button
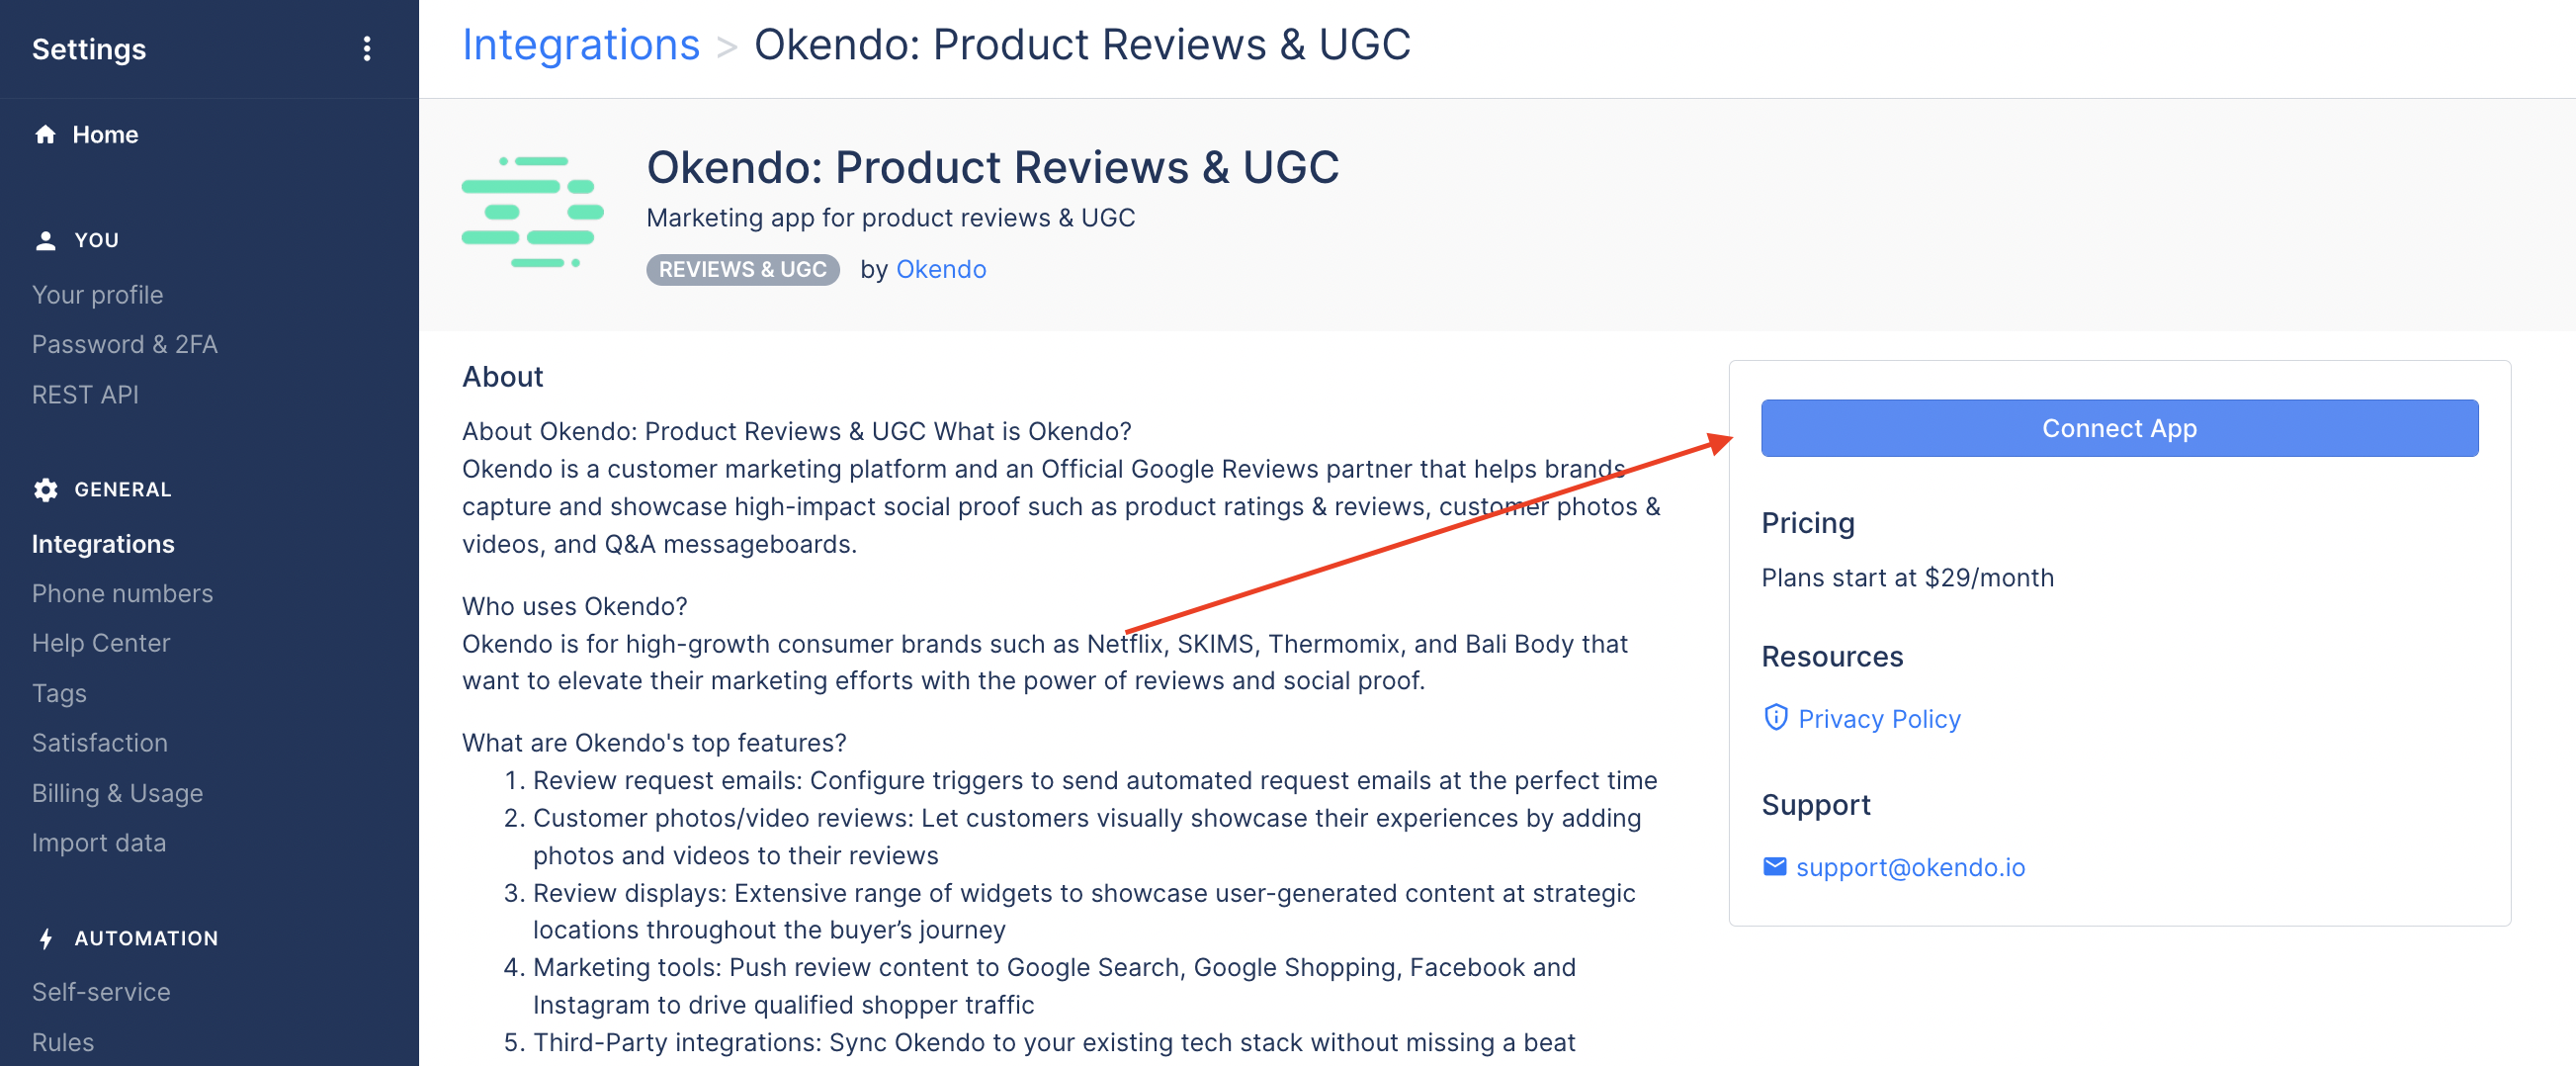
Once approved by our team , your app will appear in our in-product App Store (Settings → Integrations) where Gorgias users can install the app by clicking Connect App in your app listing:

Gorgias in-product App Store
Note that the public link in the App Store will always go to the latest approved version of your app.
Once the Gorgias user clicks the Connect App button they will get redirected to the App URL that you specified in the Draft App submission form .
The redirect then takes the form of the following URL:
https://your-gorgias-app.com/oauth/install?account=acme
where acme is Gorgias subdomain that allows your app to know which Gorgias customer the requests is coming from. To simplify our examples, let's use acme as the Gorgias account that you'll work with.
Gorgias SubdomainsNote that all requests towards our APIs need to go to a specific Gorgias account (identified by the subdomain). E.g.:
GET https://acme.gorgias.com/api/account
Once you receive a request from that URL your app should generate an authorization redirect towards https://acme.gorgias.com/oauth/authorize with the necessary URL params (see more about this below).
Below is an example of an authorization redirect.
Note that in a real-world scenario it will come from the user's web browser and will contain cookies, but they are omitted here for brevity.
curl 'https://acme.gorgias.com/oauth/authorize?\
response_type=code&\
client_id=60925f8fe90ded5e265acdf1&\
scope=openid+email+profile+offline+write:all&\
redirect_uri=https://your-gorgias-app.com/oauth/callback?account=acme&\
state=XZXZV2dXvFudpo8HTaL7cPwGJxr4XS&
nonce=0327tRehleepX9gcgA7O'client_id: The Client ID that you had got from the developer portal.scope: "permissions" the app requires for completing the authorization flow. More about this in OAuth2 Scopes.redirect_uri: Where to redirect (on the app's back-end) after the app is authorized in order to get the tokens.state: Random string, protecting against CSRF attacks.nonce: Random string, binds it with the token, so we identify the original request that issued it.
Consent page
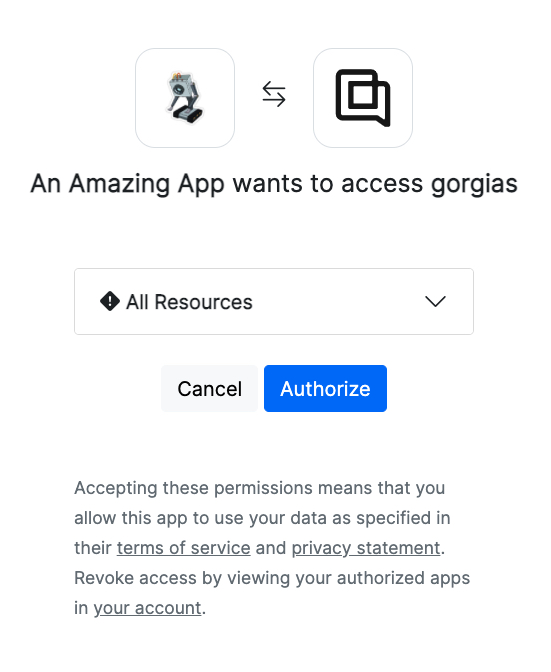
A permissions consent page will be displayed and if the customer accepts them they will be redirected into the redirect_uri with a code parameter and the very same state you provided. Through state you can verify if the request was originally triggered by you.
Example consent window:

Gorgias Auth Consent window
Getting the access_token
access_token
Theaccess_tokenretrieved here is only valid for 24 hours, and will need to be renewed after that. You can use therefresh_tokenprovided in the same response to renew youraccess_token. Therefresh_tokendoes not expire for now. See next section about how to renew youraccess_tokenusing yourrefresh_token.
To receive the access_token you need to make a POST call into Gorgias' /oauth/token endpoint (e.g.: https://acme.gorgias.com/oauth/token) with the code received during the authorization step.
During this step you need to authenticate the request with your app credentials (Client ID and Client Secret).
curl -u <client_id>:<client_secret> -X POST https://acme.gorgias.com/oauth/token \
  -d grant_type=authorization_code \
  -d redirect_uri="https://your-gorgias-app.com/oauth/callback?account=acme" \
-d code=ruu5ebEeAcdxSYrbR7T65xpFhA6fo99O98xX9wlRhqnFehj6redirect_uri: The very same redirect URL you used during the authorization step.code: The code you received after successfully authorizing the app.
You'll get a JSON response containing the access_token and refresh_token.
{
    "access_token":"eyJhbGciOiJSUzI1NiIsInR5cCI6",
    "expires_in":0,
    "id_token":".3MiOiJodHRwczovL2FjbWUtY21pbi5uZ3Jvay5pbyIsImF1ZCI6WyI2MDkyNWY4ZmU5MGRlZDVlMjY1YWNkZjEiXSwiaWF0IjoxNjIwODQ3MDA5LCJleHAiOjE2MjA5MzM0MDksImF1dGhfdGltZSI6MTYyMDg0Njk1OCwibm9uY2UiOiIwMzI3dFJlaGxlZXBYOWdjZ0E3TzExMSIsImF0X2hhc2giOiJzX3RUVFA3OU9yNUJzOHJnMndUZFVRIiwic3ViIjoxMCwibmFtZSI6IkNvc21pbiBQb2llYW5hIiwiZW1haWwiOiJjb3NtaW5AYWNtZS5nb3JnaWFzLmlvIn0.v7Hl0iULirBC5UpxeoHpPFuEMLcZKz6IrR8xrLFIcLdT6LB-20u1UPei2ZlpO4ZoyojIglJNKYc1oPYHk1FExa9CKSJGw-dsQVumqNXP7Xk4AwN9PYYIOhyJHA37eRqsbGiLWzMDS4QknZ-OPnrgMFUSSDF1bhyQRqrXiVLOGmESOMJNUd5xKiaQ3a9t7tWdu3IB7Y8sx9UwYC8VOqZSzE3Zihn0Ydg6_xQ9u9ocLKK7bIar7r3aYADUVwBkAzB7J59QN0RZxVnEAtDQZFqViEK0gImWaWpDOMQBPRNpkm3VFZCQYY50qJAA9Pb53XRdvkCyC6R06vYiawgkNUjd4g",
    "refresh_token":"Bn8nh9P76uDYZb6wADnV93CyuiqaKaaI00mXQpWFWjfbBR06",
    "scope":"openid email profile offline write:all",
    "token_type":"Bearer"
}access_tokencan be used with theAuthorization: Bearer <token>header in order to make authorized Gorgias API requests.refresh_tokenwill be used for issuing new access tokens once the one you use expires.
You can now use the access_token to make requests against the Gorgias API. For example:
curl --request GET \
  --url https://acme.gorgias.com/api/account \
--header 'Authorization: Bearer eyJhbGciOiJSUzI1NiIsInR5cCI6'Wohoo! Congrats!
Now you have access to the Gorgias API using OAuth2. If your app requires a permanent authorization you should read below on refresh tokens.
Issuing a new access token
The received access_token is valid for a period of time, afterwards you need to issue a new one using the non-expiring refresh_token. Example:
curl -i -u <client_id>:<client_secret> -X POST https://acme.gorgias.com/oauth/token \
  -d grant_type=refresh_token \
  -d refresh_token=Bn8nh9P76uDYZb6wADnV93CyuiqaKaaI00mXQpWFWjfbBR06
You should receive a response like:
{
    "access_token":"eyJhbGciOiJSUzI1NiIsInR5cCI6IkpXVCIsImtpZCI6IjB6NWZwe",
    "expires_in":0,
    "scope":"openid email profile offline write:all",
    "token_type":"Bearer"
}
Revoking the refresh token (uninstalling the app)
A Gorgias user can remove access of the app by pressing the Uninstall button or by manually revoking the refresh_token. Note that the app will still have access until the current access_token expires as it is stateless.
You can also do it for the user like so:
curl -i -u <client_id>:<client_secret> -X POST https://acme.gorgias.com/oauth/revoke \
  -d token=<refresh_token>
To obtain a new refresh_token the Gorgias user has to go through the app authorization process again.
Closing notes
- OAuth2 enhanced security: PKCE layer isn't enabled yet (
code_challenge,code_verifier) - Sample Flask Application that uses the entire OAuth2 flow can be found here
OAuth2 Client SDK
We highly recommend using an official OAuth client library to handle the entire OAuth2 authentication flow - this is especially useful when dealing with expiring tokens. There are lots of great SDKs in many different languages.
Updated 5 months ago