Create integrations and widgets
Introduction
Gorgias is lot more useful when connected to your back-office and 3rd party applications, allowing you to leverage the power of all your services from within your helpdesk, all in one platform.
This is where Integrations and Widgets come in.
Integrations help you connect to those additional services using custom HTTP API calls. Widgets are containers that can be used to display customized customer data coming from these integrations on the right-hand sidebar of the ticket or customer page.
There are native Gorgias integrations, developed and maintained by the Gorgias team, that can be found in the Integrations page in the helpdesk and there are custom HTTP integrations that can be built by any account admins using the settings' UI or the Gorgias REST API.
In this tutorial we will focus on the latter:
- a custom HTTP integration that connects Gorgias and Loop Returns,
- and a widget to display data coming from Loop Returns into your helpdesk.
Requirements
3rd Party Application
This tutorial was built using example data from an existing Gorgias partner, Loop Returns. If you are a 3rd party developer, this tutorial is applicable to you but you will need to fulfill certain requirements to build an integration with Gorgias.
To build an HTTP integration with Gorgias you will need to provide the following:
- Ability to generate valid API Keys for 3rd party tools to authenticate to your service
- API endpoint from which Gorgias can fetch data given customers' email address
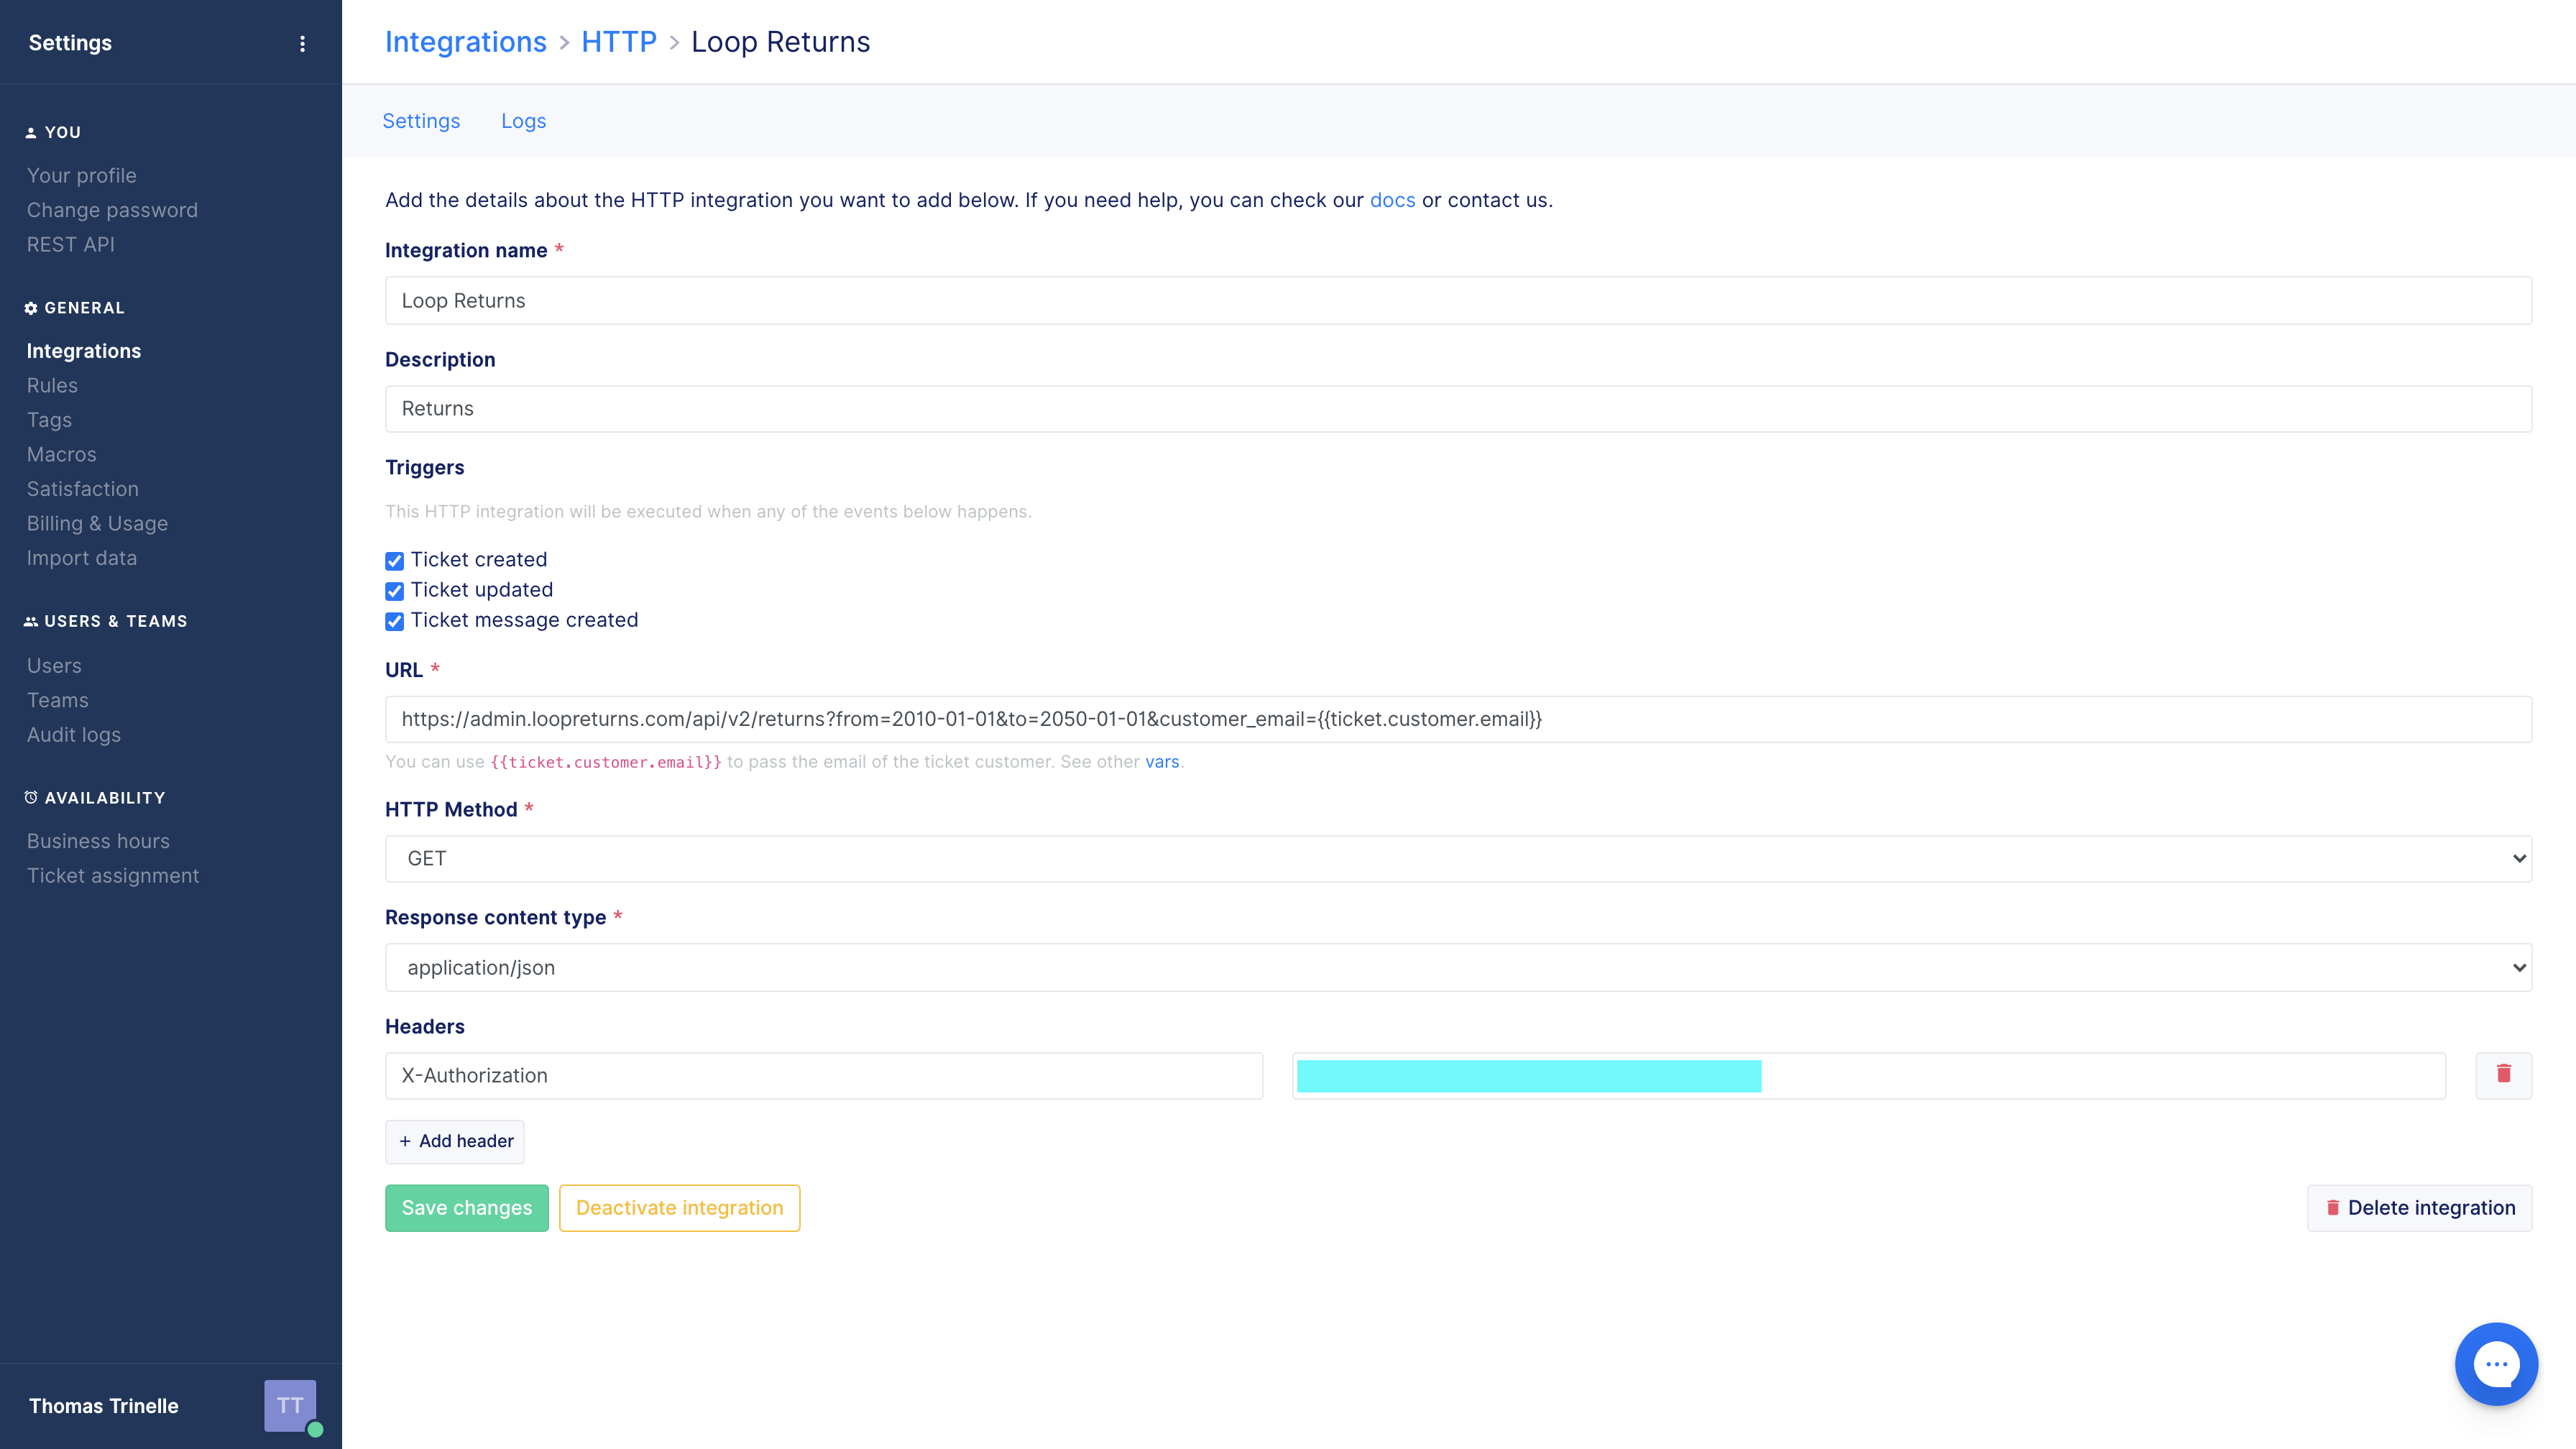
See an example below of a compatible API endpoint with a screenshot of the HTTP integration configured using Loop Return's API endpoint.
https://{{YOUR_GORGIAS_BASE_API_URL}}.com/api/users?email={{ticket.customer.email}}
Example Loop Returns HTTP integration
Gorgias REST API access
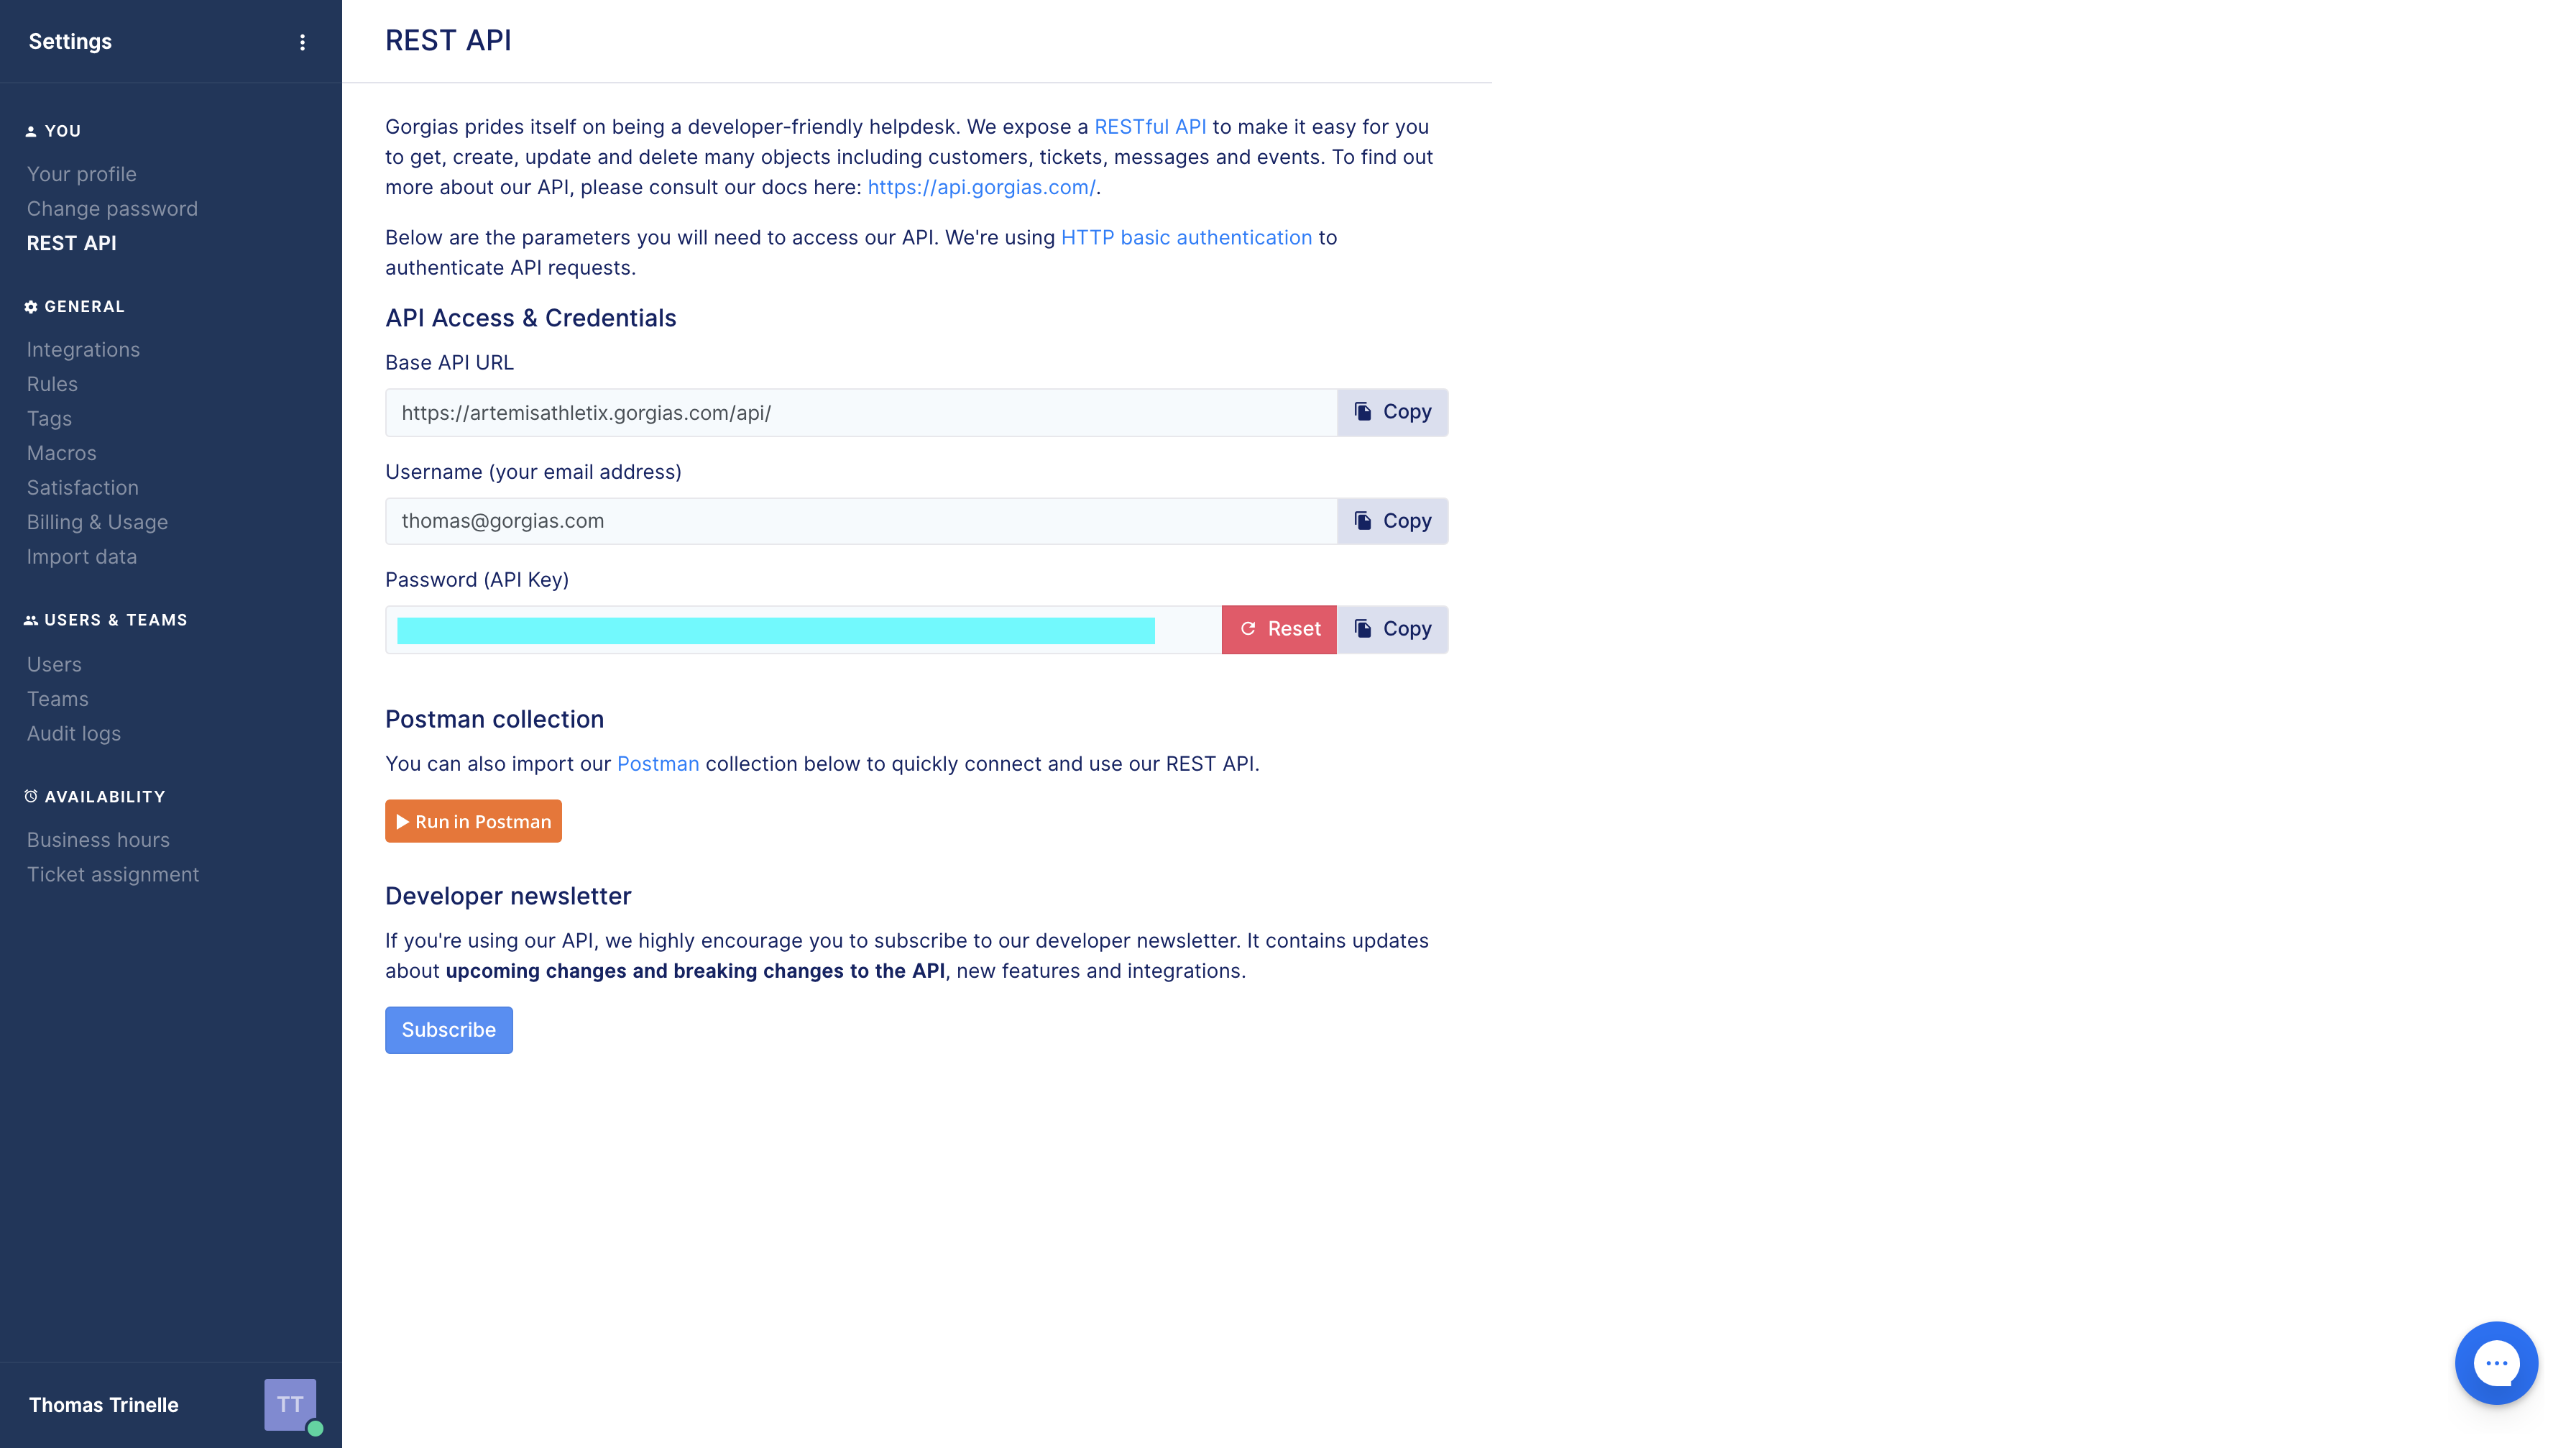
Remember that in order to make API requests to the Gorgias REST API you need the access details available at the REST API page of your Settings section in your helpdesk.
In there you will find:
- Your Gorgias Base API URL
(e.g.http://{{YOUR_GORGIAS_BASE_API_URL}}.gorgias.com/api) - Your Gorgias API username (email address)
- Your Gorgias API key (password)

REST API details of a Gorgias account
Example: Working with Loop Returns
In order to create the Loop Returns integration and widget inside Gorgias, you will need first to have a valid API key from Loop Returns. Similarly, if you are trying to build an integration for another service make sure you are provided the right level access in the tool.
Moving forward, all further examples will be provided using Loop Returns' service.
You can get a valid API key from the Developers page in your Loop Returns Admin panel. Double-check that the API key you intend to use has all scopes enabled (Cart, Order, Return, Report).
Why Loop Returns?Gorgias and Loop Returns have recently announced a new integration. With real-time access to every return or exchange in Gorgias, your agents can finally deliver an amazing customer returns experience all in one platform. We've published a step-by-step article that explains how to set-up the integration using the Gorgias' interface.
The purpose of this article is to use the exact same steps and examples to reproduce a programmatic guide. Naturally, these steps are applicable to any 3rd party application which offers an API endpoint with customer information. You will be able to create a seamless support experience by placing additional data inside your customer's Gorgias admin.
Creating the integration
To create an integration with Loop Returns, you will create a HTTP integration that uses GET to retrieve data (in JSON format) whenever a ticket is created, updated or has a new message in Gorgias.
The main details you need is the destination URL of the external service, the HTTP data required by it (HTTP method, headers, content type of the request and response, and payload) and the Gorgias events that will trigger the process.
In the case of Loop Returns integrations, the URL will be static:
https://api.loopreturns.com/api/v2/returns?from=2010-01-01&to=2050-01-01&customer_email={{ticket.customer.email}}.
Your request will be authenticated using a custom HTTP header expected by the Loop Returns API.
Remember to replace the variables in the following snippet with the actual values (i.e. your Loop Returns API key and your Gorgias REST API access details):
# Creating the integration
curl -X "POST" "{{YOUR_GORGIAS_BASE_API_URL}}/api/integrations" \
     -H 'Content-Type: application/json;' \
     -u '{{YOUR_GORGIAS_API_USER}}:{{YOUR_GORGIAS_API_KEY}}' \
     -d '{
  "name": "Loop Returns",
  "description": "Integration to handle returns via Loop Returns",
  "type": "http",
  "http": {
    "url": "https://api.loopreturns.com/api/v2/returns?from=2010-01-01&to=2050-01-01&customer_email={{ticket.customer.email}}",
    "method": "GET",
    "headers": {
      "X-Authorization": "{{YOUR_LOOP_RETURNS_API_KEY}}"
    },
    "triggers": {
      "ticket-created": true,
      "ticket-message-created": true,
      "ticket-updated": true
    },
    "request_content_type": "application/json",
    "response_content_type": "application/json"
  }
}'
The API will give you a response similar to:
HTTP/1.1 201 CREATED
Content-Type: application/json

{
    "created_datetime": "2021-01-19T20:36:21.742013+00:00",
    "deactivated_datetime": null,
    "decoration": null,
    "deleted_datetime": null,
    "description": "Integration to handle returns via Loop Returns",
    "http": {
        "execution_order": 99,
        "form": null,
        "headers": {
            "X-Authorization": "{{YOUR_LOOP_RETURNS_API_KEY}}"
        },
        "id": 1,
        "method": "GET",
        "request_content_type": "application/json",
        "response_content_type": "application/json",
        "triggers": {
            "ticket-created": true,
            "ticket-message-created": true,
            "ticket-updated": true
        },
        "url": "https://api.loopreturns.com/api/v2/returns?from=2010-01-01&to=2050-01-01&customer_email={{ticket.customer.email}}"
    },
    "id": 123,
    "locked_datetime": null,
    "mappings": [],
    "meta": {},
    "name": "Loop Returns",
    "type": "http",
    "updated_datetime": "2021-01-19T20:36:21.742028+00:00",
    "uri": "/api/integrations/123/",
    "user": {
        "id": 1
    }
}
Take note of the ID of the newly created integration object (in our example, 123) and go to the next step to create the widget.
Integrations APIYou can find details about the Integration resource in the documentation.
Creating the widget
Having created the integration successfully, and having the ID of that integration ready, let's proceed and create the widget.
In this case, we want to create a widget that appears next to a ticket (context=ticket), at the right-hand sidebar.
Formatting the widget
The trickiest part is setting up a valid, coherent value for the widget template. This template determines how and where the data from the integration is displayed. In general, a template is a JSON object following this structure:
{
    "type": "TYPE_OF_ELEMENT (e.g. wrapper, text, boolean, date, etc)",
    "title": "My widget element",
    "path": "PATH_IN_JSON_RESPONSE_FROM_INTEGRATION (e.g. ticket.id)",
    "meta": {"INTERNAL_SETUP": "..."},
    "widgets": [
        {"type": "", "title": "", "path": "", "meta": {}, "widgets": ["..."]},
        {"type": "", "title": "", "path": "", "meta": {}, "widgets": ["..."]},
        ...
        {"type": "", "title": "", "path": "", "meta": {}, "widgets": ["..."]},
    ]
}
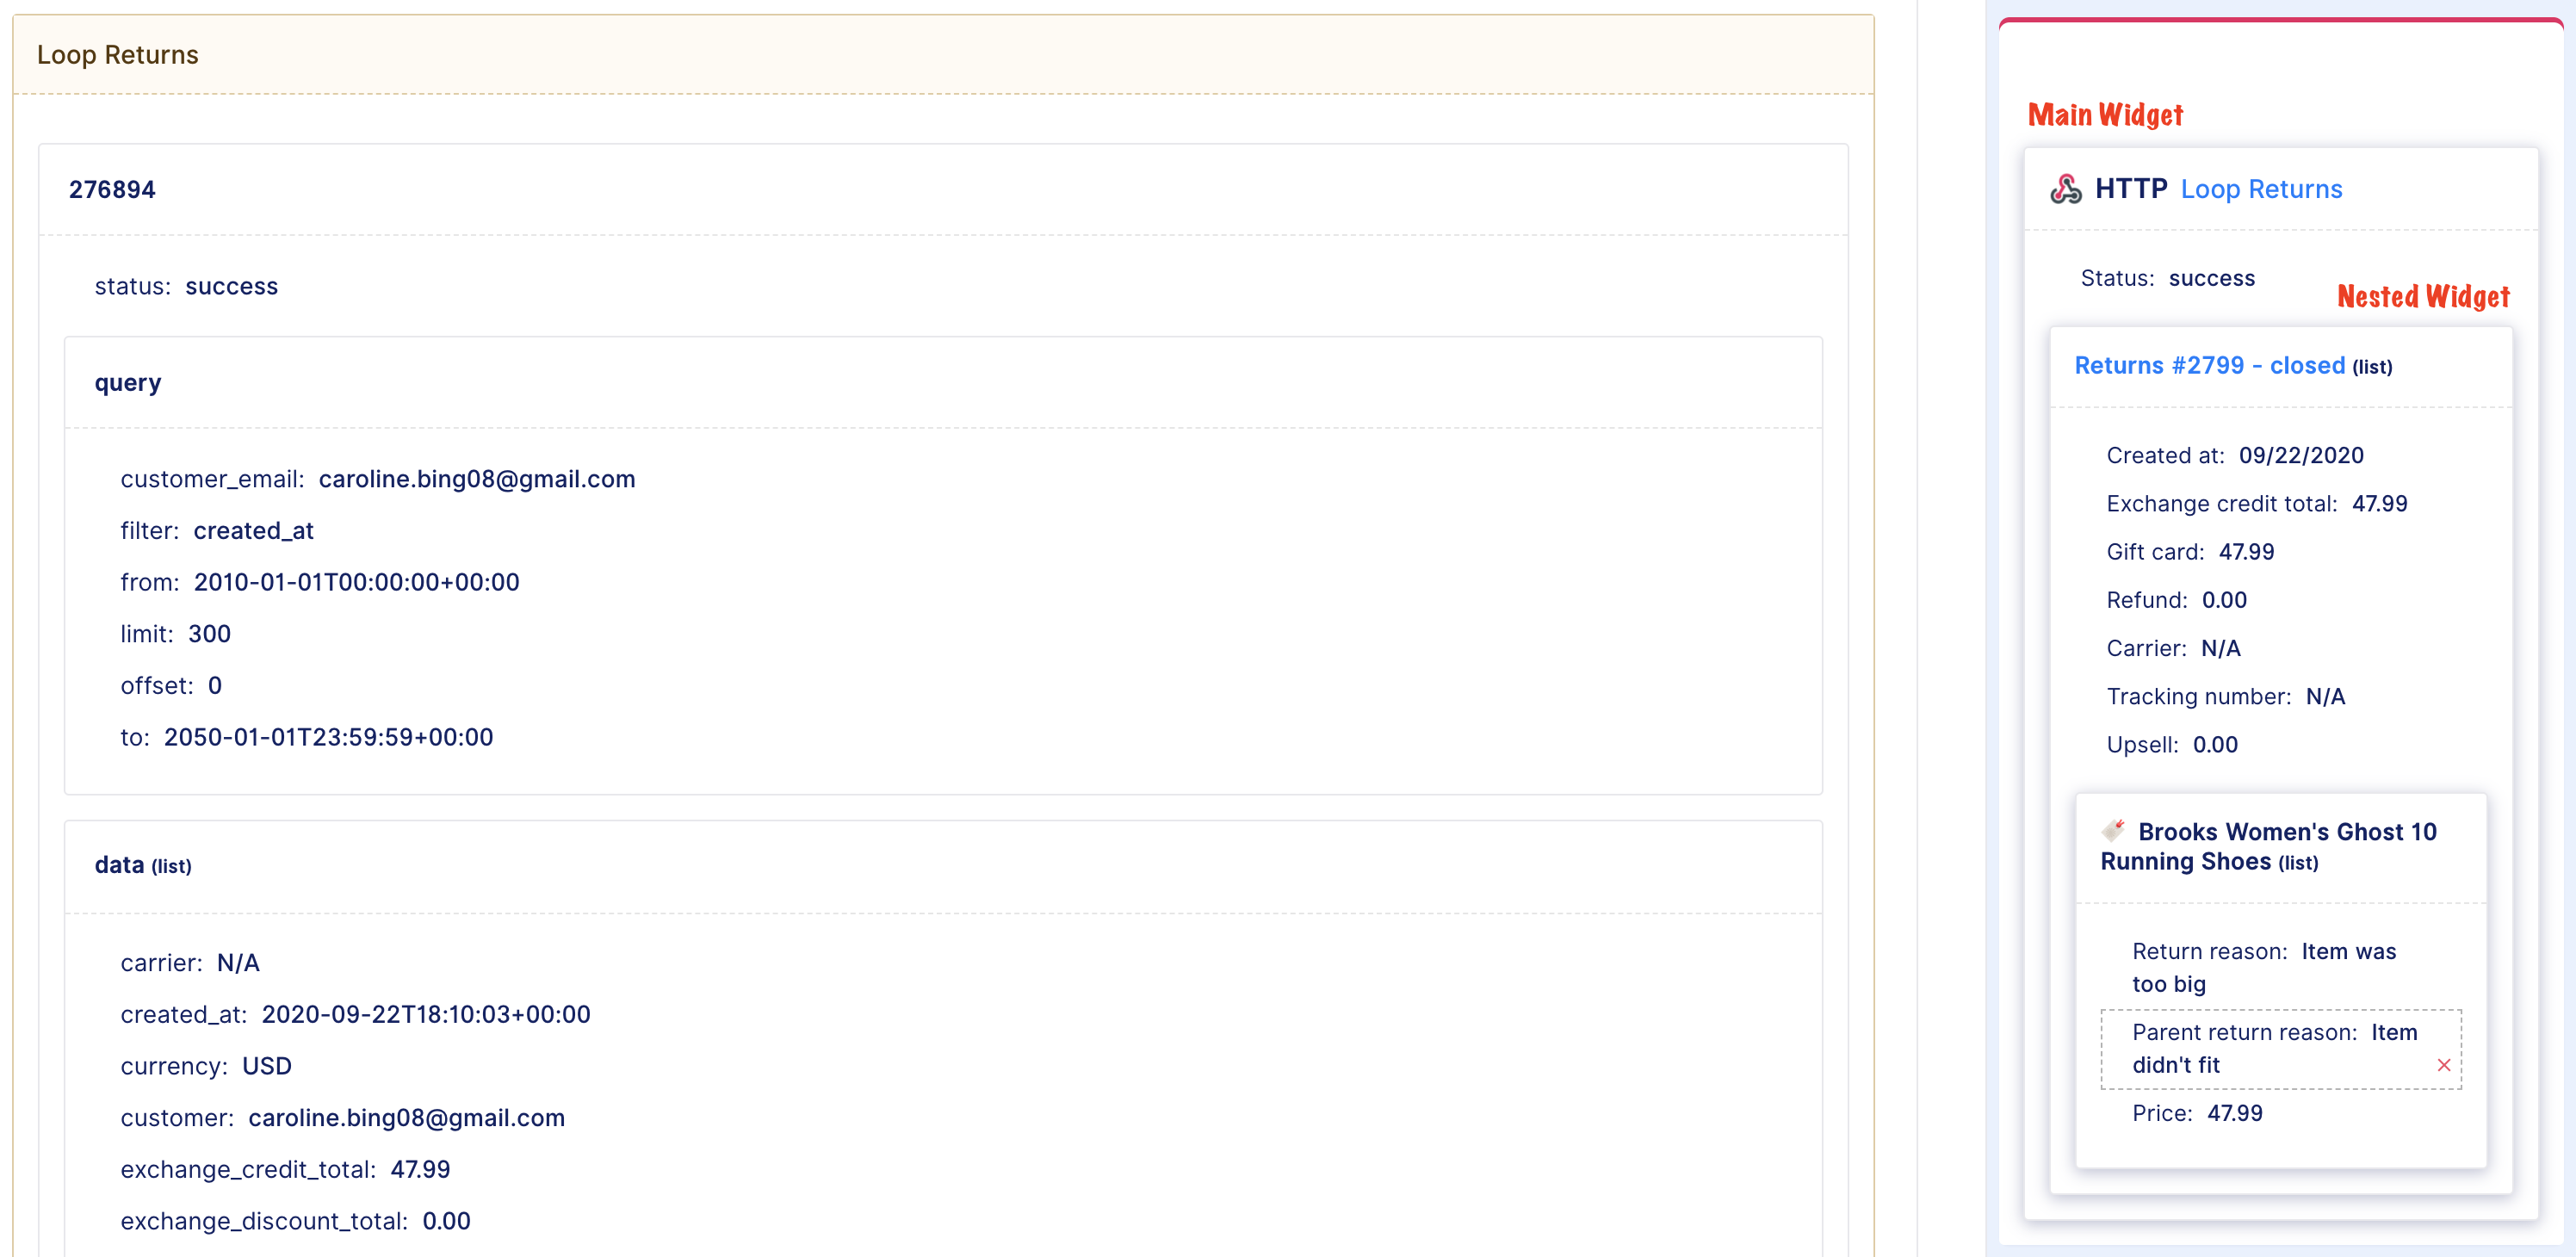
As you can see in the JSON above, widgets have a recursive structure –widgets can include nested widgets. In the Gorgias interface this shows as separate section in the widget. This also means that each section have the same formatting capabilities as the main widget itself.

Example Widget structure in the Loop Returns widget
At the moment, you have the following formatting and customization options for each widget:
- Title: customize the title with dynamic variables, add link to the title, set maximum number of characters to display and / or hide title
- Icon & border color: add your brand icon and brand color to the widget. Note: a border color can only be added to the parent container.
- Order: decide the display order of widgets nested at the same level (for instance: Orders list, Returns list, etc.)
- Fields: customize a field's title (defaults to JSON key name) and type (each type has a proper display option)
Using dynamic variablesSimilarly to macros, you can leverage the data provided by the integration as dynamic variables to customize your widget. You can specify variables by using double curly brackets and the name of the field such as
{{name}}. If you want to use nested information make sure to provide the downward path such as{{order.id}}
For example:
{
    "type": "card",
    "title": "Loop Returns",
    "path": "",
    "meta": {
        "link": "https://STORENAME.loopreturns.com/#/",
        "displayCard": true
    },
    "widgets": [
        {
            "type": "text",
            "title": "Status",
            "path": "status"
        },
        {
            "type": "card",
            "title": "Return Items",
            "path": "",
            "widgets": ["... NESTED WIDGET'S FIELDS ..."]
        }
    ]
}
From there we can extract the following:
typeiscard: this means this is defined as a section –in this case, the main widget- The title of this main widget is
Loop Returnsand will be rendered as a link tometa.link - The main widget has one inner field called
Statusthat obtains its value frompath - The main widget has also a inner section called
Return Items
What ispath?Path is a string of where to find the target value, relative to the JSON response of the integration. For example, if a HTTP integration returns a JSON object like
{"data": {"id": 123}}, then setting path todatain the first card widget and thenidin a text widget immediately below will render123.
You can find more details on our recommended widget format here, but the following snippet can serve as inspiration:
# Creating the widget
curl -X "POST" "{{YOUR_GORGIAS_BASE_API_URL}}/api/widgets" \
-H 'Content-Type: application/json;' \
-u '{{YOUR_GORGIAS_API_USER}}:{{YOUR_GORGIAS_API_KEY}}' \
-d '{
"context": "ticket",
"type": "http",
"integration_id": {{ID_OF_THE_INTEGRATION_CREATED_ABOVE}},
"template": {
"type": "wrapper",
"widgets": [
{
"meta": {
"displayCard": true,
"link": "https://STORENAME.loopreturns.com/#/"
},
"path": "",
"title": "Loop Returns",
"type": "card",
"widgets": [
{
"path": "status",
"title": "Status",
"type": "text"
},
{
"meta": {
"limit": "",
"orderBy": ""
},
"path": "data",
"type": "list",
"widgets": [
{
"meta": {
"displayCard": true,
"link": "https://admin.loopreturns.com/returns/{{id}}"
},
"title": "Return {{order_name}}: {{state}}",
"type": "card",
"widgets": [
{
"order": 0,
"path": "created_at",
"title": "Created at",
"type": "text"
},
{
"order": 1,
"path": "label_status",
"title": "Label status",
"type": "text"
},
{
"order": 2,
"path": "label_updated_at",
"title": "Label updated at",
"type": "text"
},
{
"order": 3,
"path": "carrier",
"title": "Carrier",
"type": "text"
},
{
"order": 4,
"path": "tracking_number",
"title": "Tracking number",
"type": "text"
},
{
"order": 5,
"path": "state",
"title": "State",
"type": "text"
},
{
"order": 6,
"path": "updated_at",
"title": "Updated at",
"type": "text"
},
{
"order": 7,
"path": "currency",
"title": "Currency",
"type": "text"
},
{
"order": 8,
"path": "return_product_total",
"title": "Return product total",
"type": "text"
},
{
"order": 9,
"path": "return_discount_total",
"title": "Return discount total",
"type": "text"
},
{
"order": 10,
"path": "return_tax_total",
"title": "Return tax total",
"type": "text"
},
{
"order": 11,
"path": "return_total",
"title": "Return total",
"type": "text"
},
{
"order": 12,
"path": "handling_fee",
"title": "Handling fee",
"type": "text"
},
{
"order": 13,
"path": "refund",
"title": "Refund",
"type": "text"
},
{
"order": 14,
"path": "gift_card",
"title": "Gift card",
"type": "text"
},
{
"order": 15,
"path": "exchange_product_total",
"title": "Exchange product total",
"type": "text"
},
{
"order": 16,
"path": "exchange_discount_total",
"title": "Exchange discount total",
"type": "text"
},
{
"order": 17,
"path": "exchange_tax_total",
"title": "Exchange tax total",
"type": "text"
},
{
"order": 18,
"path": "upsell",
"title": "Upsell",
"type": "text"
},
{
"order": 19,
"path": "exchange_total",
"title": "Exchange total",
"type": "text"
},
{
"meta": {
"limit": "",
"orderBy": ""
},
"order": 21,
"path": "line_items",
"type": "list",
"widgets": [
{
"meta": {
"displayCard": true,
"link": ""
},
"title": "Return Items",
"type": "card",
"widgets": [
{
"order": 0,
"path": "title",
"title": "Title",
"type": "text"
},
{
"order": 1,
"path": "product_id",
"title": "Product id",
"type": "text"
},
{
"order": 2,
"path": "variant_id",
"title": "Variant id",
"type": "text"
},
{
"order": 3,
"path": "sku",
"title": "Sku",
"type": "text"
},
{
"order": 4,
"path": "parent_return_reason",
"title": "Parent return reason",
"type": "text"
},
{
"order": 5,
"path": "return_reason",
"title": "Return reason",
"type": "text"
},
{
"order": 6,
"path": "price",
"title": "Price",
"type": "text"
},
{
"order": 7,
"path": "discount",
"title": "Discount",
"type": "text"
},
{
"order": 8,
"path": "tax",
"title": "Tax",
"type": "text"
},
{
"order": 9,
"path": "refund",
"title": "Refund",
"type": "text"
}
]
}
]
}
]
}
]
}
]
}
]
}
}'This is how the widget from the request above would look like:

Loop Returns widget example
Please noteFor all widget integrations, the widget will only be displayed if the ticket's customer has associated data in your app.
Widgets APIYou can find details about the Widgets resource in the documentation.
You can also see how to modify a widget using Gorgias UI in this loom video.
And that's all!
In 2 easy-to-follow steps your helpdesk has been enhanced and you can create other integrations to continue to do so.
Custom actions
All you need to know about custom actionsYou can read this article to know more about custom actions: https://updates.gorgias.com/publications/custom-actions-in-every-widget
The custom widget json can be set to any root card widget and must follow the structure below:
{
         "meta":{
            "link":"",
            "custom":{
               "links":[
                  {
                     "url":"https://developers.gorgias.com/docs/create-integrations-and-widgets-programmatically",
                     "label":"My first redirection link"
                  }
               ],
               "buttons":[
                  {
                     "label":"My 1st action",
                     "action":{
                        "url":"https://test-manuel.ngrok.io/posts",
                        "body":{
                           "contentType":"application/json",
                           "application/json":{

                           },
                           "application/x-www-form-urlencoded":[

                           ]
                        },
                        "method":"GET",
                        "params":[],
                        "headers":[
                           {
                              "key":"cryptic_key",
                              "label":"Secret key",
                              "value":"l337_5p34k",
                              "editable":true,
                              "mandatory":true
                           }
                        ]
                     }
                  },
                  {
                     "label":"My 2rd action",
                     "action":{
                        "url":"https://gorgias-rocks.ngrok.io/comments",
                        "body":{
                           "contentType":"application/x-www-form-urlencoded",
                           "application/json":{},
                           "application/x-www-form-urlencoded":[
                              {
                                 "key":"user",
                                 "label":"User name",
                                 "value":"{{ticket.customer.name}}",
                                 "editable":false,
                                 "mandatory":false
                              }
                           ]
                        },
                        "method":"POST",
                        "params":[],
                        "headers":[]
                     }
                  }
               ]
            },
            "displayCard":true
         },
         "path":"",
         "type":"card",
         "order":0,
         "title":"My integration",
         "widgets":[]
      }
Make sure that the action settings are properly set in the meta and then the custom key.
About custom action variablesYou can use dynamic variables in custom actions.
Relative pathThe path you set to reach the data is relative to the widget it is in.
For example, if you have an shopify integration with this data{partner: {name: John}}in a card widget whose path ispartner, you can simply do{{name}}to access the name.
Standard variablesIf for some reason, you want some other data, you can still use the default
ticketorcustomerobject.Note that you can also use the
current_userobject. It refers to the agent currently logged in. There are four available fields insidecurrent_user:
- name
- lastname
- firstname
e.g.
{{current_user.email}}
Updated 5 months ago